


Boiling water tap installation: UK guide for 2026
A competent DIYer can fit a boiling water tap in 1–2 hours on a like-for-like swap, but the electrical work almost always needs a qualified tradesperson. Budget roughly £150–£400 for a straightforward boiling tap installation in the UK, covering parts and labour. Three situations mean you should call a professional without hesitation: you need a new socket, your water pressure sits outside the 1.5–5 BAR working range, or your under-sink cabinet lacks the space or ventilation the boiler tank requires.
Quick-reference summary:
- DIY feasibility: Yes, for plumbing-literate homeowners replacing an existing tap with an existing 13A socket already in place
- Typical time: 1–2 hours for a like-for-like swap; add 1–3 hours for new electrical work, a pressure-reducing valve (PRV), or cabinet modifications
- Typical cost: £150–£400 for a standard job; more complex installs can push beyond that
- Call a professional when: a new socket is required (Part P building regulations apply in England and Wales), pressure exceeds 5 BAR, or under-sink space or ventilation is marginal
Simcodirect stocks a range of compatible instant hot water heaters and accessories with fast UK delivery, making it a practical first stop before you book an installer.
Key takeaways
A competent DIYer can handle the physical plumbing on a like-for-like boiling water tap swap, but electrical work and commissioning almost always require a qualified professional to protect both safety and warranty.
| Point | Details |
|---|---|
| Pressure range matters | Confirm mains pressure is between 1.5 and 5 BAR before buying; fit a PRV if it exceeds 5 BAR. |
| Part P applies to new sockets | Adding or moving a fixed 13A socket in England and Wales is notifiable work requiring a registered electrician. |
| Commissioning protects warranty | Record installer name, date, filter serial, and commissioning checks to satisfy most manufacturers’ warranty terms. |
| Budget realistically | A straightforward install typically costs £150–£400; complex jobs with new electrical work or PRV fitting can exceed that. |
| Simcodirect for compatible units | The Zip Aquapoint and Zip Varipoint ranges are available at Simcodirect with full specs and fast UK delivery. |
Table of Contents
- What to check before your boiling water tap installation
- Step-by-step installation: from isolation to commissioning
- Tools and parts you need, and how long the job takes
- What does boiling water tap installation cost in the UK?
- Should you DIY or hire a professional?
- Common problems and how to diagnose them
- How to choose the right tap and tank size
- Maintenance, filter changes and commissioning records
- Safety precautions specific to boiling water taps
- Why professional commissioning is worth paying for even when you do the fit yourself
- Simcodirect: compatible heaters and accessories with fast UK delivery
- Sources
What to check before your boiling water tap installation
Getting this stage right saves you a wasted trip to the merchant and a second call-out charge. Trade guidance from P&H Engineering is clear: confirm ventilation, available space, and power outlet placement before you purchase anything.
Space under the sink
- Measure internal cabinet height and depth. Most boiler tanks need at least 80mm of clear headroom above the unit for hose connections and heat dissipation.
- Check the tap hole diameter: the standard is 35mm. If you are drilling a new hole, confirm the tap’s collar size first.
- Account for hose runs. Longer runs lose heat and may require larger-bore pipe.
Power supply
- You need a dedicated, correctly earthed electrical socket inside the cabinet. A trailing extension lead is not acceptable.
- In England and Wales, adding or relocating a fixed socket is notifiable work under Part P of the Building Regulations. Use a registered electrician for any new fixed wiring.
Water pressure
- The working range for most systems falls within a moderate pressure range; if pressure is high, a pressure reducing valve (PRV) is typically required to protect the tank and preserve the manufacturer’s warranty.
- Measure pressure during a low-demand period (early morning, before showers) for the most accurate reading. A pressure gauge on an outside tap or washing machine inlet gives a reliable figure.
Ventilation and discharge
- The boiler tank generates heat. A sealed, unventilated cabinet shortens its lifespan. Check there is adequate airflow or plan a vent.
- If your model uses a tundish or air break, the WaterRegsUK multifunction taps guidance is explicit: the discharge route must accept high-temperature water. Standard plastic waste pipe may not be suitable; check against D2-rated pipe specifications.
Permissions and waste handling
- The Water Supply (Water Fittings) Regulations 1999 require that drinking water pipework is installed so water is not warmed above 25°C where reasonably practicable, and that systems allow for draining and servicing. Keep this in mind when routing cold feeds near heat sources.
- If you are replacing an old tap or boiler, check your local council’s guidance on disposing of small electrical appliances. Most local household waste recycling centres accept them under WEEE regulations.
Pro Tip: Measure your water pressure twice: once during peak morning use and once late at night. If the readings differ significantly, your supply pressure fluctuates and a PRV is worth fitting regardless of the average reading.
Step-by-step installation: from isolation to commissioning
This sequence applies whether you are doing the physical work yourself or briefing a plumber. Consumer guidance from Ideal Home frames the job as two distinct parts: the physical plumbing fit, which many confident DIYers can handle, and the electrical and commissioning checks, which usually need a qualified tradesperson.
- Isolate water and power. Turn off the mains cold supply at the stopcock. Switch off the relevant circuit at the consumer unit or, at minimum, unplug the existing appliance. Never work on live electrics near water.
- Remove the old tap (if applicable). Disconnect supply hoses, unscrew the tap nut from below, and lift the tap clear. Dry the area thoroughly before proceeding.
- Position the boiler tank. Place it in the cabinet with at least 80mm of clearance above the unit. Route the vent or tundish discharge to a suitable waste connection. Secure the tank to prevent movement.
- Connect the plumbing. Run the cold feed to the boiler tank inlet via an isolation valve. This valve is not optional: it allows future filter changes and servicing without isolating the whole kitchen supply. Connect the boiling outlet to the tap’s dedicated feed. For three-way or four-way taps, connect the filtered cold and standard hot/cold feeds separately.
- Fit the tap. Drop the tap through the 35mm hole, tighten the retaining nut from below, and connect the supply hoses finger-tight before using a basin spanner to snug them up. Do not overtighten compression fittings.
- Electrical connection. Plug the boiler into the dedicated 13A socket. If no socket exists, stop here and call a Part P-registered electrician. Never use an extension lead or a shared socket.
- Prime and fill. Slowly open the isolation valve and allow the tank to fill. Watch for leaks at every joint for at least two minutes before proceeding.
- Fit the filter. Install the filter cartridge per the manufacturer’s instructions and record the installation date. Most filters need replacing every 6–12 months.
- Commission and test. Switch on power and allow the boiler to reach temperature (typically 10–15 minutes). Test the boiling outlet carefully. Check the RCD trips correctly by pressing the test button on the consumer unit. Record the commissioning date, installer name, and filter serial number for the warranty file.
- User briefing. Explain the child-safety mechanism on the tap handle, the expansion drip behaviour (see troubleshooting below), and the filter change schedule.
Pro Tip: Run the boiling outlet into a jug for the first 30 seconds after commissioning. This purges any air and carbon fines from a new filter, giving you clean water from the first proper use.
Tools and parts you need, and how long the job takes
Essential tools
- Adjustable spanner and basin spanner (the latter is non-negotiable for tightening the tap nut in a confined cabinet)
- Spirit level for positioning the boiler tank
- Pipe cutters if you are modifying copper supply lines
- Drill with a 35mm hole-saw bit if cutting a new tap hole
- PTFE tape for threaded connections
- Leak-detection cloths or dry tissue paper to spot weeps at joints
- Torch or head torch
Parts checklist
- Boiling tap and spout assembly
- Boiler/tank unit with power lead
- Filter cartridge (often supplied with the tap; confirm before ordering)
- Isolation valves (at least one on the cold feed to the tank)
- Flexible hoses in the correct lengths
- PRV if your pressure exceeds 5 BAR
- Tundish kit if your model is vented and the discharge route needs one
Time expectations
A like-for-like swap with an existing socket and correct pressure: 1–2 hours. Add time for a new tap hole (30–45 minutes), PRV fitting (30–60 minutes), or cabinet modification. If an electrician needs to fit a new socket, that is typically a separate visit. UK cost guides at MyJobQuote confirm that straightforward installs generally sit at the lower end of the time range, keeping labour costs modest.
For compact kitchens, the Simcodirect guide to horizontal water heaters covers orientation options when upright tanks will not fit the cabinet height.
What does boiling water tap installation cost in the UK?
Costs split into three buckets: the tap and tank, consumables, and labour. Checkatrade’s cost breakdown notes that additional items such as a PRV, electrician call-out, and cabinet alterations materially affect the final quote.
Boilingwatertap.com’s FAQ puts a standard installation in the £150–£400 range and cautions that adding or moving sockets can invalidate warranties if done incorrectly.
Factors that push costs up:
- New electrical work under Part P (notifiable, requires a registered electrician)
- PRV fitting when mains pressure exceeds 5 BAR
- Hard-water areas where an anti-scale filter or softener is advisable
- Longer hose runs requiring additional fittings
- Chiller or blender valve additions on four-way systems
When requesting quotes, ask specifically what is included: labour only, or labour plus parts? Is commissioning included, or charged separately? A fixed-price quote is standard for straightforward jobs; time-and-materials is more common when the electrician’s scope is uncertain.
Should you DIY or hire a professional?
The honest answer depends on one question: does a dedicated, correctly earthed 13A socket already exist inside the cabinet? If yes, and your pressure is within range, a plumbing-literate DIYer can handle the physical fit. If no, the decision is made for you.
DIY is reasonable when:
- A dedicated 13A socket is already in place
- Water pressure is confirmed between 1.5 and 5 BAR
- The cabinet has adequate space and ventilation
- You are replacing an existing tap on the same hole
- You are comfortable with basic plumbing (compression fittings, isolation valves)
Hire a professional when:
- A new socket is needed (Part P applies in England and Wales)
- Pressure is outside the acceptable range and a PRV is required
- The cabinet needs structural modification
- You have any doubt about the electrical supply or earthing
Warranty and commissioning
Many manufacturers require professional commissioning to validate the warranty. Commissioning is not just switching the unit on: it involves checking pressure, verifying the filter is correctly seated, testing the RCD, and recording the installation details. P&H Engineering’s guidance flags electrical safety and commissioning as the primary reasons to use a professional, not the plumbing connections themselves.
Pro Tip: If you are confident doing the physical fit but want warranty protection, pay for a commissioning-only visit. The tradesperson checks your work, signs off the commissioning record, and you avoid paying for labour on the straightforward plumbing.
Common problems and how to diagnose them
Leak under the sink
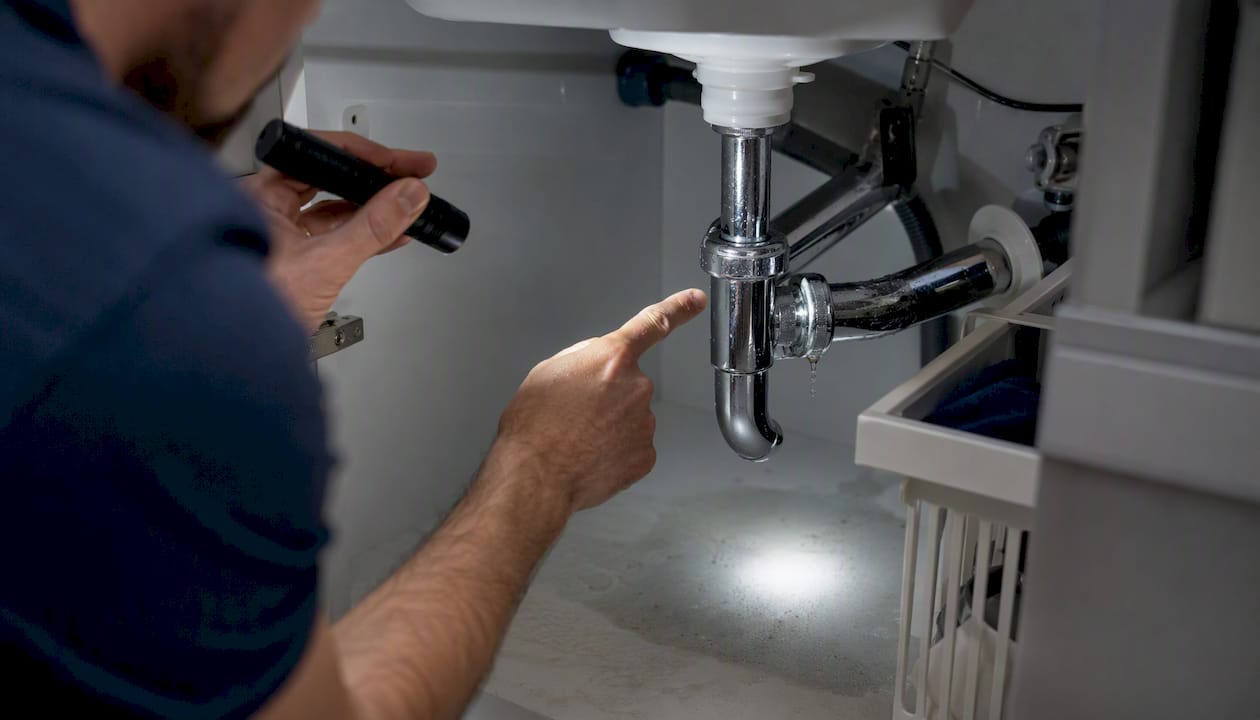
Isolate the water supply immediately. Dry the area, then slowly reopen the supply and watch each joint individually. Most leaks at this stage are under-tightened compression fittings or missing PTFE tape on threaded connections. Do not over-tighten: a quarter-turn past finger-tight is usually sufficient for compression fittings.
Warm water but not boiling
Check the power supply first: is the socket switched on and the boiler’s indicator light showing? If the unit is powered but not reaching temperature, the RCD may have tripped. Reset it once. If it trips again, isolate the unit and call an electrician.
RCD trips on switch-on
This points to an electrical fault in the boiler or wiring. Do not reset repeatedly. Isolate the unit, disconnect it from the socket, and call a qualified electrician. Never attempt to bypass the RCD.
Occasional drip from the spout
In vented boiler systems, a small amount of expansion water can drip from the spout as the tank heats up. P&H Engineering’s technical notes confirm this is normal behaviour and that forcing the tap closed may damage the valve or the boiler. Record it in the commissioning notes and explain it to the household.
Persistent leaks or repeated electrical trips
Stop work and call a professional. Persistent leaks suggest a component fault or incorrect fitting; repeated electrical trips indicate a wiring or appliance fault that is beyond DIY diagnosis.
How to choose the right tap and tank size
Tank capacity is the decision most buyers get wrong. A 2.4-litre tank suits a one- or two-person household using the tap mainly for tea and coffee. A 4-litre tank handles a busier kitchen or a household of four. Larger tanks take longer to heat from cold but recover faster between uses.
Functionality choices
- Three-way taps deliver filtered cold, standard cold, and boiling from one spout. They need only a cold feed and the boiler connection.
- Four-way taps add a standard hot supply, replacing the conventional mixer tap entirely. They need a hot feed connection too, which adds plumbing complexity.
- Chiller options add filtered chilled water, requiring a separate chiller unit under the sink and additional space.
Space checklist before buying
- Confirm internal cabinet height allows 80mm clearance above the boiler tank
- Check the tank’s footprint against your available floor space
- Plan the tundish or vent discharge route before the tank arrives
- Verify hose lengths: most kits supply 600mm hoses, which suits most cabinets, but longer runs need upgrading
What to confirm on the product page
- Power rating (kW) and whether a 13A socket is sufficient
- Tank dimensions (height × width × depth)
- Minimum and maximum working pressure
- Warranty terms and commissioning requirements
Simcodirect’s product pages for the Zip Aquapoint oversink/undersink water heater and the Zip Varipoint oversink/undersink heater include full specification data, making it straightforward to cross-check dimensions and power requirements against your cabinet measurements before ordering.
Maintenance, filter changes and commissioning records
A boiling water tap system that is commissioned correctly and serviced on schedule will typically outlast its warranty period. P&H Engineering’s installer advice is direct: leaving a maintenance schedule with the user and fitting isolation valves at installation are the two actions that most improve long-term reliability.
Suggested maintenance schedule
- Monthly: visually check under-sink connections for weeps; confirm the boiler indicator light is showing normal operation
- Every 6–12 months: replace the filter cartridge per the manufacturer’s cadence (hard-water areas typically need more frequent changes)
- Annually: full inspection of hoses, fittings, and the boiler tank; check pressure; test the RCD
Commissioning checklist
Commissioning at installation should cover: pressure verified within range, filter correctly seated and dated, RCD tested, expansion behaviour noted, and all connections leak-tested under pressure. Record the installer’s name, the date, the filter serial number, and the boiler model and serial number. Keep this record with the appliance manual.
For a broader view of what a thorough home plumbing inspection covers, the Chicago Home Inspector’s maintenance guide offers a useful general checklist, though note it reflects US practice and UK-specific regulations take precedence.
Disposal of old equipment
When replacing an existing boiler tank or tap, the old unit is a small electrical appliance under WEEE regulations. Most local household waste recycling centres accept these free of charge. Do not dispose of them in general waste.
Safety precautions specific to boiling water taps
Boiling water taps operate at or near 100°C. The risks are real and specific, and they differ from a standard hot tap in ways that are worth stating plainly.
Scald risk
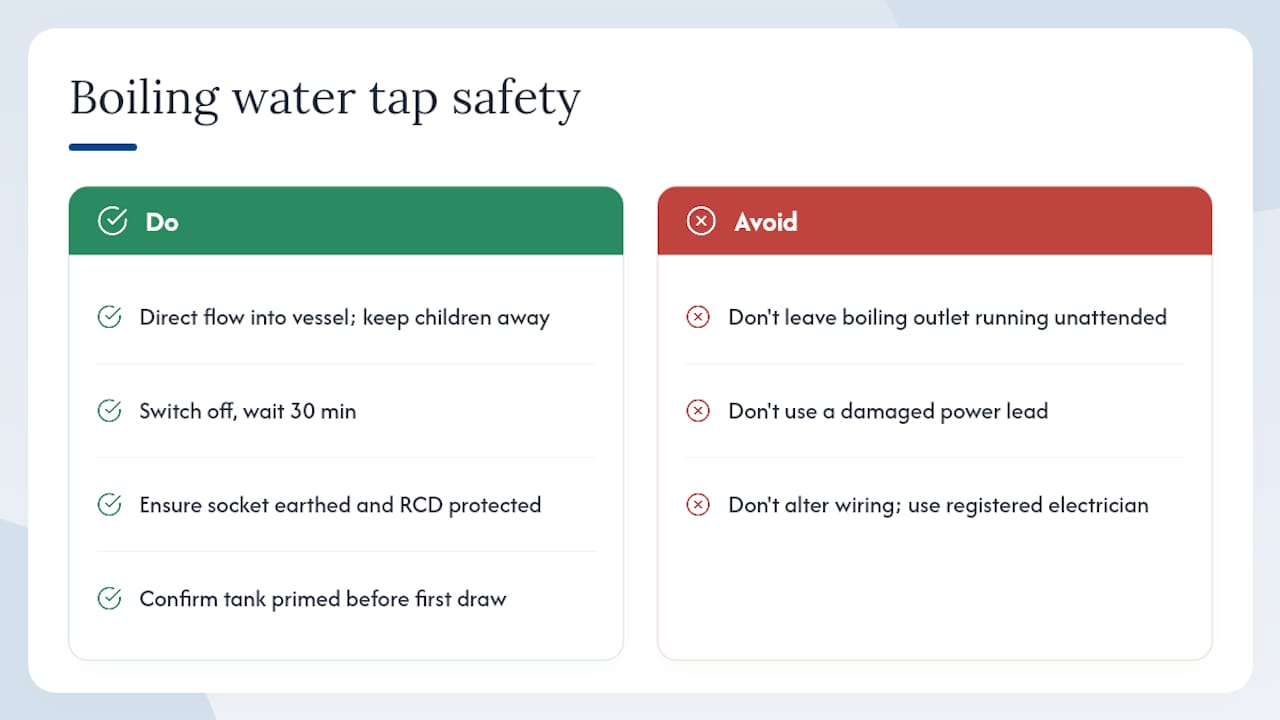
The water from the boiling outlet is genuinely at boiling point, not just hot. Always direct the flow into a vessel before it contacts skin. Keep children away from the tap during use: most models include a spring-loaded or push-and-turn safety mechanism on the boiling handle, but this is not a substitute for supervision. Never leave the boiling outlet running unattended.
Handling hot components
After the boiler has been running, the tank body and supply hoses close to it will be warm. When servicing or replacing filters, switch off the boiler at the socket and allow at least 30 minutes for the unit to cool before touching internal components or disconnecting hoses.
Electrical safety
Water and electricity in close proximity demand specific care. The socket must be correctly earthed and protected by an RCD. Never use a damaged power lead. If the lead shows any sign of wear, replace the unit or the lead before use. Any modification to fixed wiring, including adding a fused spur, is notifiable under Part P in England and Wales and must be carried out by a registered electrician.
First use after installation
Before the first boiling draw, confirm the tank is fully primed and the indicator light shows the unit has reached operating temperature. Drawing from an incompletely filled tank can damage the heating element. If the unit makes unusual sounds during initial heat-up, switch off and check that the tank filled correctly during priming.
Why professional commissioning is worth paying for even when you do the fit yourself
Most installation failures I see discussed in trade forums are not caused by bad plumbing. They come from skipped commissioning: a filter seated incorrectly, a pressure check never done, or an RCD that trips six months later because the earthing was never verified. The physical fit is the easy part.
The argument for doing the plumbing yourself and paying a professional only for commissioning is genuinely sound. You save the labour cost on the straightforward work, and you get a signed commissioning record that satisfies most manufacturers’ warranty requirements. That record is also your evidence if something goes wrong later.
One thing worth saying plainly: the expansion drip that some vented systems produce is not a fault, but homeowners who were not told about it at commissioning often call it one. A proper commissioning visit includes explaining this to the household. That five-minute conversation prevents a lot of unnecessary call-outs.
Pro Tip: Ask the commissioning engineer to walk through the filter change procedure with you at the visit. Watching it done once is worth more than reading the manual three times.
Simcodirect: compatible heaters and accessories with fast UK delivery
If you have worked through the pre-installation checklist and know your cabinet dimensions, power setup, and pressure, the next step is matching those specs to the right boiler unit.
Simcodirect supplies a range of compatible water heaters, including the Zip Aquapoint unvented oversink/undersink heater and the Zip Varipoint oversink/undersink model, with full specification data on each product page so you can cross-check dimensions and power ratings before ordering. Fast UK delivery and a 30-day returns policy mean you are not committed if the unit does not fit your cabinet. For replacement components, the thermostatic heating element is available directly, keeping servicing costs down over the system’s life. Browse the full range at Simcodirect or contact the sales team for guidance on compatible accessories.
Sources
The following sources are worth reading before you order or book an installer:
- Advice on fitting three‑way, boiling water and filter taps - P&H Engineering
- The Water Supply (Water Fittings) Regulations 1999, schedule 2 (UK legislation)
- Boiling water tap cost: Price breakdown 2026 | Checkatrade
- Boiling Water Tap Installation Cost Guide (2026 Update) | MyJobQuote
- Multifunction taps information leaflet (WaterRegsUK)