


Hand dryer maintenance: a facility manager's care and repair guide
To keep commercial hand dryers reliable, run a daily exterior wipe, a monthly interior check, and service filters every few months to about a year. Always isolate power before opening any unit.
Cleaning staff can handle the exterior wipe and sensor check. A competent technician should own the interior clean, filter service, and any fault diagnosis. Manufacturer guidance and the Ecodesign study on hand dryers both back this split of responsibility, and both stress that repairability and spare-part access matter as much as the cleaning itself.
- Daily: wipe housing and sensor window; check for splash marks.
- Monthly: listen for unusual noise, spot-test airflow, inspect filter condition.
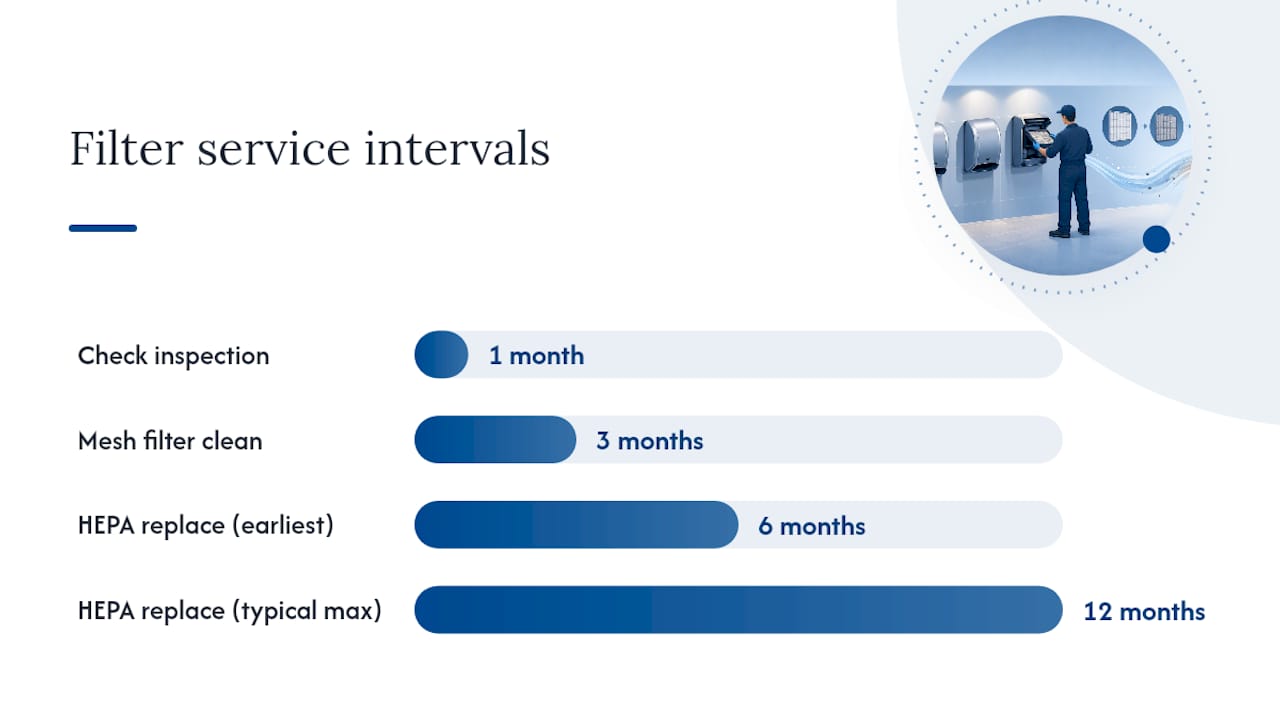
- Every 3 to 12 months: service or replace filters depending on site dust levels.
- Before any cover comes off: isolate the power at the local switch or RCD.
Three signs mean stop and call for help immediately: any smell of burning or visible smoke, severe vibration during operation, or total loss of power alongside a tripped RCD. None of these are DIY fixes.
Key Takeaways
Reliable hand dryer performance depends on isolating power before internal work, servicing filters on a schedule matched to site dust levels, and logging every task against dates and part numbers.
| Point | Details |
|---|---|
| Daily exterior wipe | Use a damp cloth and mild cleaner; never solvents or abrasive pads on housing or sensor windows. |
| Interior clean every 6 months | Isolate power first, vacuum dust, and inspect fan, motor and wiring for wear. |
| Filter service 3 to 12 months | Clean mesh pre-filters quarterly; replace HEPA filters approximately every half to one year in dusty sites. |
| Loose fixings cause most noise | Tighten mounting brackets before assuming a motor bearing has failed. |
| Log every service | Record dates, tasks and part numbers to protect warranty claims and track wear. |
Table of Contents
- Hand dryer maintenance for the exterior: daily routine that works
- Interior cleaning: how to access and inspect safely
- When should you clean or replace hand dryer filters?
- What maintenance schedule should facility teams actually run?
- Troubleshooting matrix: symptoms, causes and fixes
- What tools should your maintenance kit carry?
- How long should a commercial hand dryer last?
- How should you log maintenance and handle warranty claims?
- Sourcing repairable hand dryers and genuine spare parts
- Why maintenance discipline matters more than the dryer you buy
- Frequently asked questions
- Sources
Hand dryer maintenance for the exterior: daily routine that works
Exterior cleaning is the job most sites already do badly, usually because nobody has written down the steps. Here is the sequence that actually protects the finish and the sensor.
- Switch off the unit if your model requires it for cleaning (check the manual; many units can be wiped live, but isolating removes any doubt).
- Wipe the housing, sensor window, and air inlet with a damp cloth and a mild, neutral cleaner. Manufacturer guidance is explicit here: avoid solvents, ammonia-based sprays, and abrasive pads, all of which dull finishes and can scratch sensor lenses.
- Dry the housing and test activation. Wave a hand under the sensor and note any delay or failure to trigger.
- Log anything unusual, then escalate sensor faults or discolouration to technical staff rather than attempting a fix on the cleaning round.
Stainless steel shows fingerprints fast, so a microfibre cloth after cleaning keeps it presentable. Painted finishes scratch more easily than steel, so skip scouring pads entirely. Plastic housings can craze under strong solvents, which is the most common cause of that cloudy, cracked look on older units.
Pro Tip: Keep a small laminated card taped inside the cleaning cupboard listing the approved cleaner and the “never use” list. It stops well-meaning staff reaching for whatever’s under the sink.
Interior cleaning: how to access and inspect safely
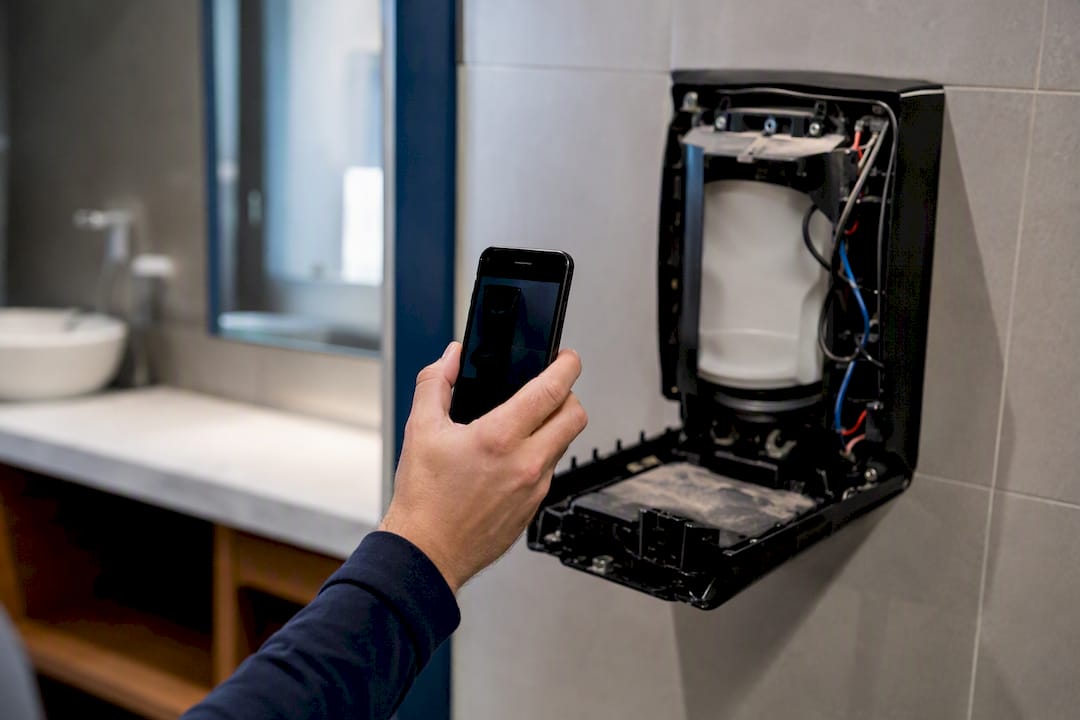
Interior work is where most avoidable damage happens, usually because someone skips the isolation step. Follow this order every time.
- Isolate the dryer at the local switch or consumer unit RCD, then verify there’s no live current before touching anything internal.
- Remove the cover following the exact sequence in the manufacturer’s manual. Forcing clips or skipping screws is the most common cause of cracked housings.
- Vacuum accumulated dust using a brush nozzle attachment, then use a soft brush on lint caught around the fan blades. Compressed air can help dislodge stubborn debris, but use short bursts and never let it drive dust further into the motor housing. Water and interior electronics don’t mix, so keep any damp cloth well away from wiring and the heater element.
- Inspect the fan, motor housing, wiring insulation, heater element, and mounting brackets for wear, discolouration, or looseness.
Manufacturer guidance recommends this interior clean at least every six months for typical commercial use, tightening to quarterly in dusty sites, food-prep areas, or high-footfall washrooms.
Pro Tip: Photograph the interior before reassembly on the first service. It gives the next technician a reference point for what “normal” wear looks like on that specific unit.
When should you clean or replace hand dryer filters?
Not every dryer has a filter, but where one exists, neglect is the fastest route to a burnt-out motor. Filters trap the dust that would otherwise reach the fan and heating element, and a blocked filter forces the motor to work harder for longer, which shortens its life.
Most commercial units use one of two filter types:
- A mesh pre-filter, usually sitting across the air inlet, which can be vacuumed or rinsed and reused.
- A HEPA-style filter, fitted deeper in the airflow path, which should be replaced rather than washed once it’s saturated.
The Ecodesign preparatory study notes that filters commonly need attention somewhere between three months and a year, depending entirely on how much dust and lint the site generates. A sensible baseline: check monthly, clean the mesh pre-filter every few months in moderate-use sites, and replace HEPA filters approximately every half to full year, sooner if airflow noticeably weakens. Always fit genuine replacement parts and log the part number against the service date. It saves a frustrating hunt through old invoices when the same part fails again.
What maintenance schedule should facility teams actually run?
A schedule only works if each task has an owner. Here’s a cadence that maps cleanly onto most facility teams:
- Daily — exterior wipe and a quick visual sensor check, done by cleaning staff during the normal round.
- Weekly to monthly — airflow spot-test, a listen for grinding or whining noise, and a check of the wall and inlet for splash marks, done by a facility technician or a nominated cleaner.
- Every 3 to 6 months — a competent-person interior clean and filter service, with condition and any parts replaced written into the log.
- Annually — a full electrical and safety check by a qualified electrician or an authorised service agent, plus a review of the maintenance log to flag units heading towards replacement.
That annual electrical check matters more than most facility teams treat it. It’s the point where a wiring fault or degrading heater element gets caught before it becomes a shutdown, or worse, a safety incident.
- Assign each tier to a named role, not just “maintenance”, so nothing falls through the gap between cleaning contract and technical staff.
- Build the filter service window into the same visit as the interior clean, since the cover is already off.
Troubleshooting matrix: symptoms, causes and fixes
Most call-outs trace back to one of a handful of causes, and knowing which saves an unnecessary part swap.
- Weak airflow or long drying times: usually a blocked filter or dust-caked fan blades. Clean or replace the filter first before assuming a motor fault.
- Intermittent activation: check the sensor window for grime or condensation, and confirm nothing is obstructing the infrared beam. Realign or clean before replacing the sensor unit.
- Loud noise or vibration: start with the mounting hardware. Loose backplate fixings are a frequent cause of rattling and vibration, and retightening them resolves most complaints at very low cost, well before you consider a worn bearing.
- No power, tripped RCD: isolate immediately and call a qualified electrician. Don’t reset the RCD repeatedly hoping it holds; that’s how wiring faults get missed.
- Burning smell or visible smoke: isolate at the switch immediately, evacuate the immediate area, and escalate to the manufacturer or an electrician. This is never a wait-and-see fault.
Pro Tip: Before booking an electrician for a noisy dryer, check the mounting bolts with a torque driver. It takes two minutes and fixes the problem more often than people expect.
Anything involving exposed wiring, a burning smell, or repeated RCD trips is safety-critical. Isolate and escalate rather than attempting a repair on-site.
What tools should your maintenance kit carry?
A well-stocked kit turns a two-visit fault into a one-visit fix.
- Tools: insulated screwdrivers, a vacuum with a brush nozzle attachment, a multimeter for electrical checks, and a socket or torque set for mounting hardware.
- Consumables and spares: spare filters (mesh and HEPA), screws, cable ties, and a light lubricant for moving parts, alongside a mild neutral cleaner for exteriors.
- PPE and isolation gear: gloves, eye protection, and lock-off tags to secure the isolator switch while work is underway.
- Stock control: keep a small on-site reserve of the filters and fixings your specific models use, since chasing a part number during a live fault costs far more time than storing one in advance.
How long should a commercial hand dryer last?
Expect a well-built, well-maintained commercial hand dryer to last roughly 7 to 10 years, with motor design and build quality doing most of the heavy lifting on that figure. A neglected unit in a busy site can fall well short of that; a well-serviced one in a lighter-use washroom can run longer.
- Sticking to the maintenance schedule above extends usable life and lowers total cost of ownership, since most failures start as a small, cheap fix that gets missed.
- Weigh repeated faults, part availability, energy performance, and noise levels together before deciding whether to repair again or replace.
- At purchase, favour models with easy internal access and available spare parts. The Ecodesign study specifically recommends improving repairability and spare-part access as a way to extend service life across the category.
How should you log maintenance and handle warranty claims?
Record the date, task, part numbers used, and technician name for every visit. This one habit does more for warranty protection than anything else on this list.
- Warranty claims are commonly rejected over unauthorised repairs or the use of incorrect cleaners, both of which a decent log helps you avoid or disprove.
- Contact the manufacturer or an authorised service agent for motor replacement, heater element faults, or electrical issues that persist after basic checks.
- Before a service visit, have the maintenance log, unit serial number, and photos of the fault ready. It cuts diagnosis time considerably.
Sourcing repairable hand dryers and genuine spare parts
Simcodirect stocks commercial hand dryers built around accessible internals and available spare parts, which matters more than the sale price once you’re three years into ownership. Units like the UltraDry Pro 1 and the QBIC Eco Hand Dryer are chosen with service access in mind, which cuts the downtime that comes from waiting on a part that no longer exists.
- Buying from a supplier that stocks genuine spares avoids the guesswork of third-party parts fitting incorrectly.
- Our hand dryer guide for commercial washrooms and essential guide to electric hand dryers cover what to check before you buy.
- For electrical installation or servicing beyond routine maintenance, Frost Plumbing’s services page outlines the kind of qualified support worth having on call.
If your current unit’s heater element has failed outright, browse Heating Element Standard or Heating Element Thermostatic options before assuming the whole unit needs replacing.
Why maintenance discipline matters more than the dryer you buy
Most facility teams treat hand dryer maintenance as an afterthought, something bolted onto a cleaning contract with no real ownership. That’s backwards. The research is consistent on one point: repairability and spare-part access predict lifetime cost better than the initial purchase price does, yet almost nobody asks about service access before buying.
The conventional advice tends to overweight cleaning frequency and underweight the annual electrical check. A daily wipe is easy to sell as “maintenance” because it’s visible. A proper interior inspection and filter service is where faults actually get caught early, and it’s the step sites skip when budgets tighten.
If you take one thing from this guide, make it the mounting hardware check. It’s the cheapest, fastest fix in the entire troubleshooting matrix, and it resolves noise complaints that would otherwise get escalated as a “faulty motor” call-out. Fix the small things first. The expensive faults tend to announce themselves anyway.
Frequently asked questions
How often should a commercial hand dryer be cleaned internally? Every 6 to 12 months for typical use, tightening to quarterly in dusty or high-footfall sites, following manufacturer guidance.
Who should carry out internal hand dryer maintenance? Exterior wiping suits regular cleaning staff. Interior work, filter service, and fault diagnosis should go to a competent technician or qualified electrician.
What causes a hand dryer to make a loud rattling noise? Loose mounting fixings are the most common cause. Tighten the backplate hardware before assuming a motor or bearing fault.
How long do hand dryer filters last before replacement? HEPA-style filters typically need replacing every 6 to 12 months, sooner in dusty environments, while mesh pre-filters can usually be cleaned and reused for longer.
What should I do if a hand dryer smells like burning? Isolate the power immediately, keep people away from the unit, and contact the manufacturer or an electrician. Don’t attempt to reset or reopen it yourself.
Sources
For deeper technical grounding, see Airdri’s maintenance procedure and the Ecodesign hand dryer study.
- Hand Dryer Maintenance Guide
- How long do commercial hand dryers last | Mitsubishi Electric
- Ecodesign preparatory study — hand dryers